Pro Secrets! Softball Bat Tape Application Tricks for 2025!
Hey there, softball enthusiasts! Ready to give your trusty bat a grip-tastic makeover? You’re in the right place! Let’s face it, a well-taped bat can be a game-changer, and I’m here to spill all the secrets on softball bat tape application. Whether you’re a seasoned pro or a newbie to the diamond, this guide will have you taping like a pro in no time. So, grab your bat!
Why Softball Bat Tape Application Matters
Let’s chat about something that might seem small but can make a huge difference in your game – softball bat tape application. I’ve been coaching softball for years, and I can’t tell you how many times I’ve seen players struggle with their grip. It’s like watching someone try to eat soup with a fork – frustrating and not very effective.
First off, a proper grip is crucial for nailing those hits. When you’ve got the right tape job, it’s like your bat becomes an extension of your arms. You’re in control, and that’s when the magic happens.
Now, let’s talk about how tape affects your bat control and swing speed. It’s not just about having something to hold onto – it’s about creating the perfect connection between you and your bat. With the right tape job, you can really feel the bat through your swing. It’s like the difference between driving with gloves on and feeling the steering wheel with your bare hands. You get more feedback, more control, and ultimately, more power.
But here’s the kicker – customizing your grip to your personal preferences is where it’s at. Everyone’s hands are different, right? Some players like a thicker grip, others prefer it thin. Some want extra cushioning, while others need more tack. The beauty of softball bat tape application is that you can make it uniquely yours. It’s like finding the perfect pair of jeans – when it fits just right, you feel amazing!
Essential Materials for Softball Bat Tape Application
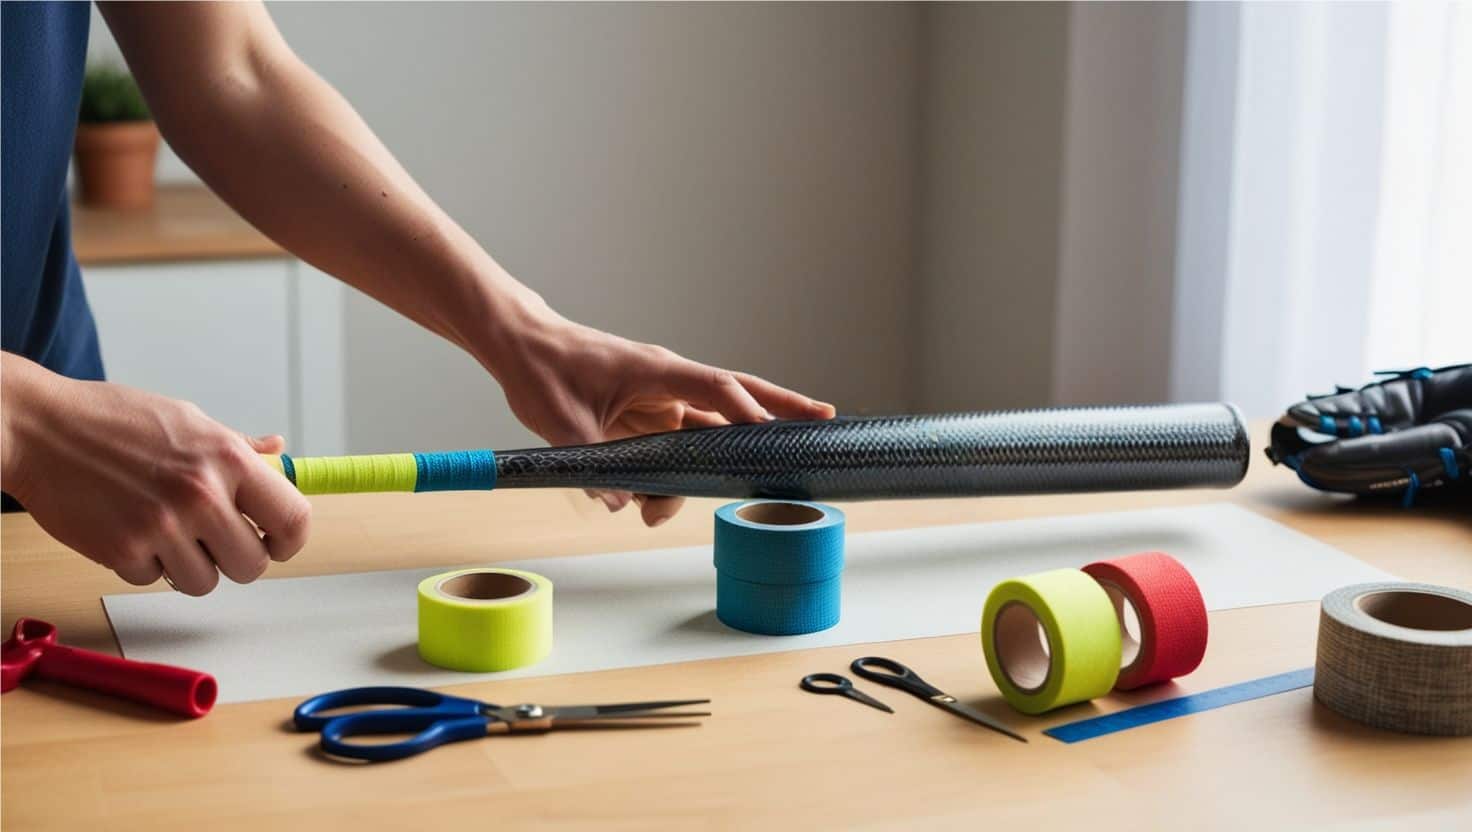
Alright, let’s get into what you need for a killer tape job. First up, you’ve gotta choose your tape. There’s cloth tape, which is like the old reliable of the bunch. It’s been around forever and gets the job done. Then you’ve got synthetic tapes, which are like the new kids on the block – they offer some fancy features like extra grip or cushioning. And don’t forget about lizard skins – these bad boys are like the Ferarri of bat tapes, offering superior grip and comfort.
Now, don’t think you can just slap some tape on and call it a day. You’ll need a few extra tools to do the job right. Grab yourself a good pair of scissors – trying to tear tape with your teeth is not a good look. You’ll also want some cleaning supplies to prep your bat. I usually use a bit of rubbing alcohol and a clean cloth. It’s like giving your bat a spa day before the main event.
Choosing the right tape for your playing style is key. If you’re a power hitter, you might want something with a bit more cushion to absorb some of that shock. If you’re all about control, a thinner tape might be your best bet. It’s like picking the right club in golf – you want something that complements your natural abilities. It’s all about finding what feels right for you. Try a few different options, find your perfect match, and your confidence at the plate will soar!
Preparing Your Bat for Taping
Before we dive into the actual softball bat tape application, we need to get your bat ready. It’s like prepping a wall before painting – if you skip this step, you’re asking for trouble.
First things first, we gotta get rid of any old tape or adhesive residue. This can be a real pain in the neck, especially if the old tape has been on there for a while. I’ve seen players try to apply new tape over old stuff, and it’s a recipe for disaster! You’ll end up with a lumpy, uneven grip that’ll throw off your whole game. So take the time to peel off that old tape and clean off any sticky bits left behind.
Once you’ve got the old stuff off, it’s time to give your bat handle a good cleaning. I like to use a bit of rubbing alcohol on a clean cloth. It’s like giving your bat a fresh start. Make sure you get all the dirt, sweat, and grime off – you’d be surprised how much can build up over a season. After you’ve cleaned it, let it dry completely. Patience is key here! Trying to apply tape to a damp handle is like trying to put a bandaid on wet skin – it just won’t stick right.
Now, here’s something a lot of players overlook – the importance of a smooth surface for application. Any little bump or rough spot can create air bubbles or weak spots in your tape job. Run your hand over the handle and feel for any imperfections. If you find any, smooth things out. It’s a bit of extra work, but it’s worth it for that perfect grip.
Step-by-Step Softball Bat Tape Application Guide
Alright, now we’re getting to the good stuff – the actual softball bat tape application. This is where the magic happens, my friends! Let’s break it down step by step.
First up, you need to find your starting point. For a standard bat grip you will start at the knob of the softball bat. Now, here’s a pro tip: start your wrap at a slight angle. This helps the tape lay flatter and reduces the chance of wrinkles.
As you’re wrapping, maintaining consistent tension is key. You want it tight enough to stay put, but not so tight that it’s strangling your bat. It’s like Goldilocks – you’re looking for that “just right” tension. And don’t forget about overlap! I usually aim for about a 1/4 inch overlap on each wrap. This ensures full coverage and helps prevent peeling.
Now, let’s talk about finishing touches. When you reach the end of your grip tape, you’ve got a couple of options. Some players like to just put the finishing tape over and call it good. I highly recommend using black electrical tape to secure the end and then put the finishing tape over that for extra security. Either way, make sure that end is secure – there’s nothing worse than your tape unraveling mid-game.
Advanced Taping Techniques for Softball Players
Okay, now that we’ve covered the basics, let’s dive into some advanced softball bat tape application techniques. This is where you can really start to customize your grip and take your game to the next level.
One popular technique is creating cushioned grips for extra comfort. This is great if you tend to get blisters or if you just prefer a softer feel. To do this, you can use foam underlayer tape before applying your main grip tape. It’s like adding an extra layer of cushioning to your favorite sneakers – it just feels good.
Another cool trick is incorporating grip-enhancing patterns. Some players like to create a spiral pattern with their tape, while others prefer a crisscross design. These patterns can add extra texture and grip to your handle. It’s kinda like those fancy ergonomic pens – they’re designed to fit your hand just right.
Now, here’s something a lot of players don’t think about – customizing your tape application for different weather conditions. If you play in a humid climate, you might want to use a tape with more tack to combat slippery hands. For cold weather games, a thicker tape can provide some insulation. It’s like dressing for the weather – you wanna be prepared for whatever Mother Nature throws at you. Sometimes, a little creativity in your softball bat tape application can make all the difference.
Maintaining Your Taped Softball Bat
Now that you’ve got your bat taped up just right, let’s talk about keeping it in tip-top shape. Proper maintenance can make your tape job last longer and perform better. It’s like taking care of a good pair of cleats – a little TLC goes a long way.
First off, cleaning your taped bat is crucial. After each game or practice, give it a quick wipe down with a damp cloth. This helps remove dirt and sweat that can break down the tape over time. Just be careful not to get it too wet – you don’t want water seeping under the tape. It’s like washing your face at night – a quick clean can keep things fresh.
Now, knowing when to replace your tape is key. If you start to notice peeling edges, bare spots, or if the grip just doesn’t feel right anymore, it’s probably time for a fresh tape job. Don’t be that player hanging onto a ratty old tape job – it’s not a good look, and it’s not doing your game any favors.
Storing your bat properly can also help preserve your tape quality. Avoid leaving it in extreme temperatures or direct sunlight. I’ve seen players leave their bats in hot cars, it’s not pretty! The heat can make the tape adhesive break down faster than a rookie in their first big game. Keep your bat in a cool, dry place when you’re not using it. A little extra effort in maintaining your softball bat tape application can pay off big time in the long run.
Troubleshooting Common Softball Bat Tape Issues
Alright, let’s face it – even with the best softball bat tape application techniques, sometimes things don’t go exactly as planned. But don’t worry, I’ve got some tricks up my sleeve for those common tape troubles.
First up, let’s talk about those pesky bubbles and wrinkles. They’re like the acne of the bat taping world – annoying and seemingly inevitable. If you spot a bubble forming as you’re applying the tape, stop right there. Carefully peel back the tape to that spot and reapply with more tension. For wrinkles, try using a credit card or something similar to smooth them out as you go. It’s like ironing a shirt – a little smoothing can go a long way.
Now, what about when your tape starts peeling at the edges? This is usually a sign that your tape job is on its last legs, but you can extend its life a bit. Try using a small piece of finishing tape over the peeling edge. It’s like using a band-aid – it’s not a permanent fix, but it’ll get you through the game.
Lastly, let’s chat about grip thickness. Sometimes, you might find that your grip is too thick or too thin after you’ve finished taping. If it’s too thick, you can try removing a layer or two of tape. If it’s too thin, consider adding an overgrip or an extra layer. It’s all about finding that Goldilocks zone where your grip feels just right.
I was panicking right before a big game. My bat tape was peeling, and I was worried it would affect my play. I did a quick fix with some finishing tape, and played without any issues! Sometimes, a little creative problem-solving in your softball bat tape application can save the day.
Remember, perfecting your softball bat tape application is a process. It might take some trial and error to find what works best for you. But once you get it right, it can make a world of difference in your game. So don’t be afraid to experiment, ask for advice, and most importantly, have fun with it!
And there you have it, my friend! – the ins and outs of softball bat tape application! With these tips and tricks up your sleeve, you’re ready to hit the field with a perfectly taped bat that feels like an extension of your arm. Remember, practice makes perfect, so don’t be afraid to experiment with different techniques until you find your sweet spot. Now, go out there and knock it out of the park! Got any cool taping tricks of your own? Share them in our social media channels – we’re always eager to learn from our fellow softball lovers!
Craving more softball wisdom? Unlock game-changing tips below!